ScriptCS-Arduino controlled Nerf gun
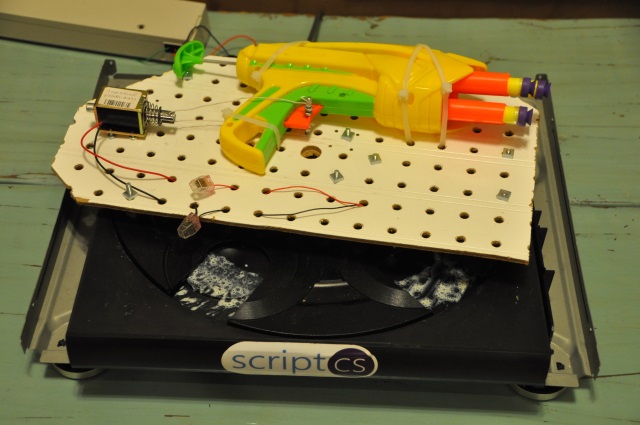
One night I was hanging out with my sons. We were talking about robotics and one of them asked if I could build a robot that would fire a Nerf gun. So we started out with a bunch of parts I had on hand to see if we could do it. I mounted the Nerf gun to a piece of peg board and then set out to see what I had that could pull the trigger. My first attempt was to use a motor that was geared way down to pull back a string that was attached to the trigger. I used an Arduino with a motor sheild to control the motor. That worked but it was slow. Since the boys were bored with a Nerf gun that took 5 seconds to fire, we called it a night.
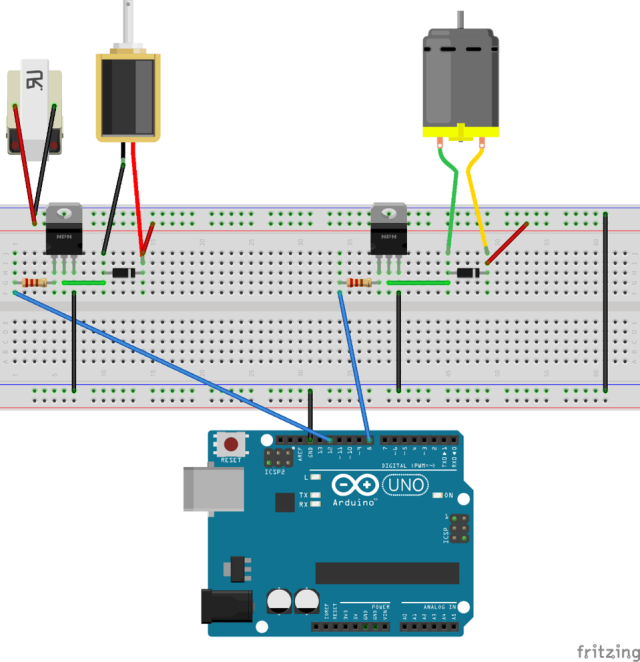
To make it faster, I ordered a 24V Solenoid from Adafruit. I had a AC adapter that I salvaged out of an old printer that I used to power the solenoid. To control the higher voltage, I used a TIP120 transistor I got from RadioShack. Now I could fire the Nerf gun almost instantly with the press of a button.
To make it more interactive, I started controlling the Arduino with the ScriptCS-Arduino library. This made it controllable from my laptop.
A few weeks later, I came across an old 5 disk CD changer. I decided to use this to rotate the gun horizontally, allowing me to aim it in different directions. I took out most of the electronics and soldered longer wires onto the motor that spins the tray. I wired the motor up to the 24V source I was using for the solenoid and controlled that with another TIP120.
In the original version, the wires went straight from the Arduino up to the solenoid. This was functional, but it meant that if I spun it around too much, the wires would get twisted or unplugged. This got old after a few weeks.
I decided that I wanted the gun to spin freely, but I needed away to get the control voltage up to the solenoid. Inspired by Ben Heck’s Steampunk Persistence of Vision Display, I mounted two metal rings on the bottom of the CD tray.
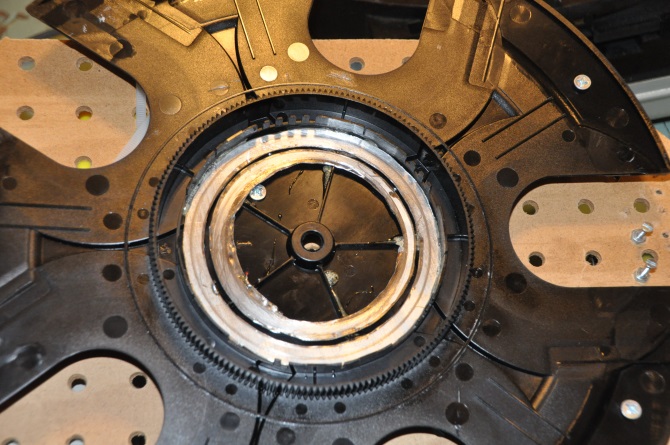
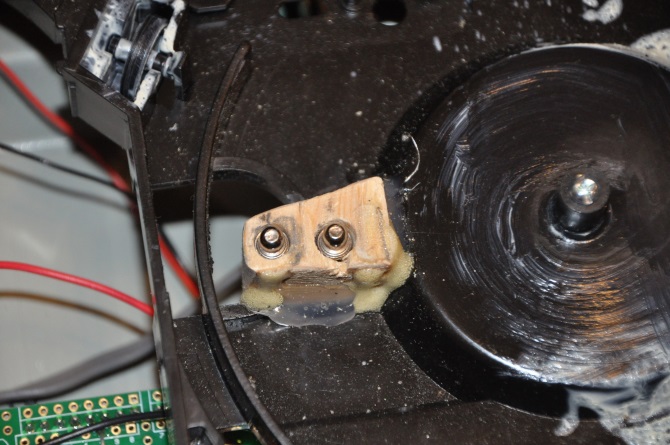
On the base, I mounted to spring mounted contacts that would create a connection to the rings above. The allows the circuit to be complete no matter what position the CD tray is in. If I had a 3D printer like Ben Heck, the build would have been much cleaner.
Over time, I continued to make improvements. I got a prototyping shield for the circuit. I got some standoffs and mounted the whole thing under the CD tray.

One problem that I encountered was that the motor drove the CD tray with a rubber band. If I put the full 24V on the motor immediately, the band would often slip. So what I decided to do was use the PWM functionality of ScriptCS-Arduino to spin the motor slowly at first and then accelerate. The made the motor spin much more reliably.
The full source code is available on GitHub in a file named NerfGunExample.csx
It is far from perfect. I am putting a lot more weight on the CD than it was designed for, so it will certainly break at some point. The control for the motor is very crude. At the very least, I should use an H-bridge so that I could spin the gun in both directions. It would be even better if I used a stepper motor so that I had much more precise control over the movements.
But it is fun to play with. It demonstrates many of the things about ScriptCS-Arduino that I really like. It is fun to play around with. Here it is in action.
ScriptCs-Arduino Controlled Nerf Gun from Eric Potter on Vimeo.
Comments Section
Feel free to comment on the post but keep it clean and on topic.
comments powered by DisqusAbout Me
 My name is Eric Potter. I have an amazing wife and 5 wonderful children. I am a Microsoft MVP for Developer Tools and Technologies, the Director of Technical Education for Sweetwater in Ft. Wayne Indiana, and an adjunct professor for Indiana Tech. I am a humble toolsmith.

pottereric.github.com