Creating a bot to play NES games with C#
I have many fond memories of playing the original NES as a kid. So when I found out that someone had created an NES emulator that had an API, I was thrilled. The emulator I’m talking about is called Nintaco. And in this post I’ll show you how to write a simple bot in C# that plays an NES game.
Nintaco is a full featured NES emulator written by a developer that goes by ‘zeroone’. You can use it to simply play games. It also has tools for more advanced play like creating tool-assisted speed runs or even playing multiplayer games over a network.
It is compiled to a jar file, so there is nothing to install. Just download the file from the Nintaco site, unzip it, and run it. You will need the ROM files for any game you want to play. But there is no additional setup. At this point you should be ready to play some sweet 8-bit games!

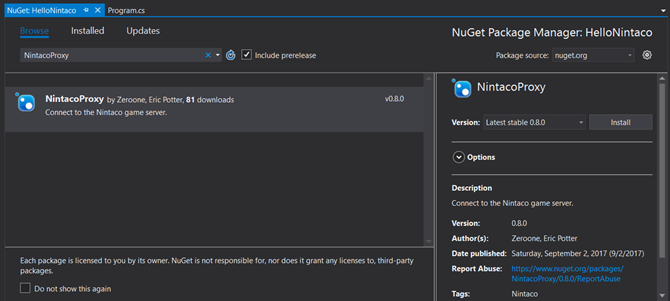
There are other NES emulators, but no other emulators that I have seen have an API. There is another zip file available on the Nintaco home page that contains sample client code in C, C#, Java, Lua, and Python. It also contains documentation for the API. With permission, I packaged the C# proxy code into a NuGet package, so that it is even faster to get started.
To get started, create a new C# Console Application. Add a reference to the NintacoProxy NuGet package.
To initiate communication with the Nintaco app, call the initRemoteAPI method on the ApiSource static class. You will need to add a using statement for the Nintaco namespace for this code to compile correctly.
        static void Main(string[] args)
        {
            ApiSource.initRemoteAPI("localhost", 9999);
            new Program().launch();
        }
The next thing you need to do is register listener methods. These get called when various events take place in the game. In this sample, I have a method named launch that I call from the Main method.
        public void launch()
        {
            api.AddFrameListener(renderFinished);
            api.AddActivateListener(apiEnabled);
            api.Run();
        }
It adds listener methods for when a frame is rendered and when the API is first enabled.
Pushing Buttons
The simplest way to write a bot is just to program a sequence of button presses. At first glance this looks simple because there is a very straightforward API method to press a button.
ApiSource.API.WriteGamepad(0, GamepadButtons.A, true);
This function simulates a user pressing the A button on the first controller. But the key is understanding when this function should get called. Remember that your code runs in response various events happening in the game. They key event happens when a frame is finished being rendered, which happens 60 times per second. The sample code above registered the renderFinished function as the event handler for the FrameListener event, so it will get called rapidly.
Calling the WriteGamepad function inside the renderFinished function will only set the state of the button for that frame (1/60th of a second). When the next frame is rendered, the button states are cleared. So you will want to set the button state in a number of consecutive frames. The number depends on how long you want to simulate pressing the button. If you want to push the button for 1 second, you need to set the button state in 60 frames in a row.
You cannot set the button state to pressed, use a Thread.Sleep(1000) to wait a second, and then clear the button state. The Sleep method would block the execution of the emulator. So what you need to do is let the emulator run and check the clock every time the renderFinished method is called. This is similar to how you should handle timed operations in Arduino programming. In Arduino development, if the code sleeps for 2 seconds, the board won’t get any inputs that occur in that time frame. Similarly with Nintaco, if the code sleeps for 2 seconds, the game will lock up for 2 seconds.
When you want to simulate pushing the A button for 2 seconds inside the renderFinished function, you must keep track of the time when the button push started. Then set the state of the button to true in every call to renderFinished that falls within the 2 second time range.
State Machines
So how would you program a sequence of button pushes. Because a button push needs to happen over many invocations of the renderFinished method, you cannot rely on the calling methods in a sequence inside of a simple loop. You need to maintain the state of the sequence between calls to renderFinished. This can be done with a simple finite state machine. You need to setup up a variable to maintain which state the program is in. Every time renderFinished is called, it checks the current state of the program. If it is time to move on to the next state, it preforms the state transition. The next time renderFinished is called it will perform the function of the new state.
The sample program I wrote is playing Bomberman. The very simple game play algorithm is to perform the following steps repeatedly.
- Move right
- Drop a bomb
- Move left
- Wait for the bomb to explode.
Each one of those steps is represented by a state in our finite state machine. To keep track of time, I am simply using the current frame count. Nintaco has an API that returns it.
int currentFrame = api.GetFrameCount();
The code starts in the MoveRight state. Every time renderFinished is called in this state, the right arrow is pushed. Then the code checks to see if the desired amount of time has passed. If it has, it records the current time and transitions to the DropABomb state. Because the bomb can be dropped in one frame, it just pushes the A button and moves to the MoveLeft state. The state machine pushes the Left button for a set amount of time, then transitions to the Wait state. The state machine says in the Wait state long enough for the bomb to explode. At the end of the Wait state, the state machine transitions back to the MoveRight state, effectively starting the loop over again. Here is the entire state machine. You can see the full application in the Bomberman Bot repo on GitHub.
private void renderFinished()
{
    int currentFrame = api.GetFrameCount();

    switch (state)
    {
	case MoveRight:
	    ApiSource.API.WriteGamepad(0, GamepadButtons.Right, true);
	    if (currentFrame - stateStartFrame > spaceTraversalTime * 4)
	    {
		state = DropABomb;
		stateStartFrame = currentFrame;
	    }
	    break;
	case DropABomb:
	    ApiSource.API.WriteGamepad(0, GamepadButtons.A, true);
	    state = MoveLeft;
	    stateStartFrame = currentFrame;
	    break;
	case MoveLeft:
	    ApiSource.API.WriteGamepad(0, GamepadButtons.Left, true);
	    if (currentFrame - stateStartFrame > spaceTraversalTime * 3)
	    {
		state = Wait;
		stateStartFrame = currentFrame;
	    }
	    break;
	case Wait:
	    if (currentFrame - stateStartFrame > spaceTraversalTime * 6)
	    {
		state = MoveRight;
		stateStartFrame = currentFrame;
	    }
	    break;
    }
}
Running the Bot
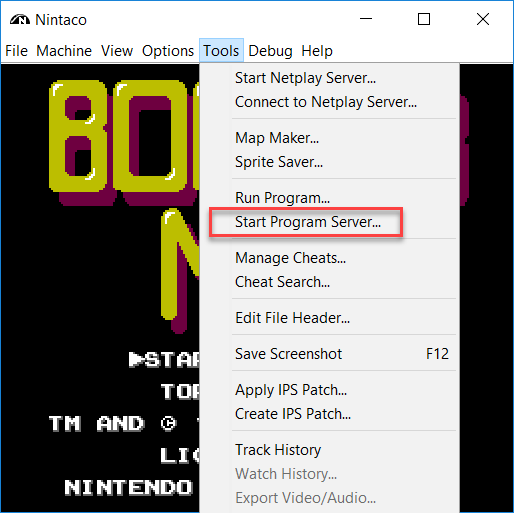
To run your bot, launch the Nintaco jar. Open the ROM you want to play. Get the game to the state where your bot should start. In the case of my example program, I need to get past the start screen and into the game. The select Start Program Server from the Tools menu.
Click Start Server on the dialog that appears. Now you are ready to run your code. Launch your app, either by itself or in the debugger. Watch your little bot play the game.
From here you could start to build up your state machine to do more complex sequences. No matter how large the sequence, the pattern stays the same.
I hope you have as much fun with this as I do.
Comments Section
Feel free to comment on the post but keep it clean and on topic.
comments powered by DisqusAbout Me
 My name is Eric Potter. I have an amazing wife and 5 wonderful children. I am a Microsoft MVP for Developer Tools and Technologies, the Director of Technical Education for Sweetwater in Ft. Wayne Indiana, and an adjunct professor for Indiana Tech. I am a humble toolsmith.

pottereric.github.com